This year, DE LA MORA Institute has launched an authorship program in which certified interpreters can join the DE LA MORA Team and earn passive income by creating content to sell in our self-paced video library. As an author, the content creation process will involve recording your voice, with the option to also record yourself on video. While we don’t require our authors to be seasoned film directors, we do have a few tips to help you make your content delivery clear and professional.
1. What You Will Need

For a successful recording session, you will only need three tools: a computer, a webcam, and a microphone. If you have a laptop, chances are you already have a microphone and camera hardware built into your computer. However, you can create higher quality content by using an external camera and mic. For starters, an external microphone helps to reduce background noise and the echo chamber effect. Below are links to the Logitech tools that we use to produce some of our videos:
Click here to view our recommended webcam
Click here to view our recommended microphone headset
These tools typically come with instructions, but the internet is also a wonderful resource. Visiting YouTube or WikiHow can make a world of a difference when trying to understand your tools.
2. One, Two, Three, Testing!
Once you’re plugged in and you have a good idea of how your tools work, it’s time to run some tests. The tests are only for you, so you can even have fun with it and record yourself singing, acting, or dancing! When you play back your video, pay attention to the following:
Light
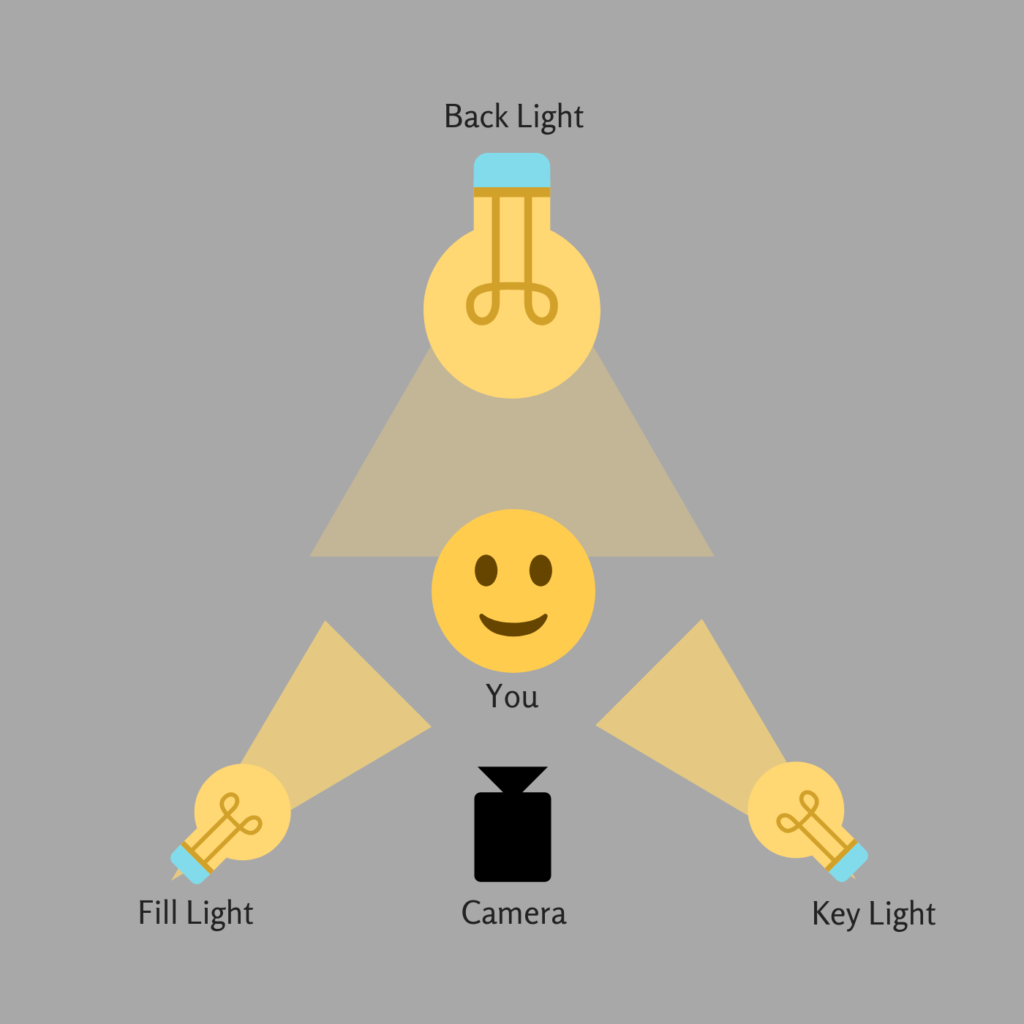
Lighting makes a world of a difference when it comes to filming. For the type of filming you will be doing, we recommend using three light sources, also known as three-point lighting (see diagram below). The three light sources consist of a key light, a fill light, and a back light. The key light and fill lights focus on casting light onto your face, while your back light illuminates your background. The key and fill lights should be placed in front of you on different sides, making an even triangle shape between you and the two lights to eliminate shadows. Household lamps can be used for these light sources. Your back light will be whatever is lighting up the rest of the room. It is important to make sure that your back light isn’t stealing your spotlight. If it is too much brighter than your two front lights, it could cause your webcam to shift its focus to the room instead of you.
Surroundings
When filming yourself, remember that you are also filming your background. This includes noise, such as your breathing or your neighbor’s lawnmower or the air conditioner. It can also include items in the background, such as your laundry hamper, kids, pets, and pictures on your wall. Doing a test video then listening and watching out for any distracting elements is a good way to identify if anything in your backgrounds needs adjusting before you film.
You
How do you look and sound? When filming, consider dressing professionally as you would for an interpreting assignment. Also be mindful of the microphone you are using. Oftentimes when using a headset, it is easy for the microphone piece to bump against your face or hair if it is too close to you. Or if it is too far, you might sound a little bit distant or echoed. Again, filming a test video will help you determine whether your appearance or the position of your microphone needs to be adjusted.
3. Time to Film!
Once you double check to make sure everything is set up and working, you’re ready to record! After that, all you will have to do is present your content, and then save your recording when you’re done filming.
We highly appreciate our authors and we make sure to be there for them throughout the entire course-creation process to help make the experience enjoyable and easy. If you are considering becoming a DE LA MORA author, visit http://delamorainstitute.com/authorship/ and apply today!